Users, Groups & Permissions
tested on Centos/Red Hat v6, v7
In Linux a user is anyone authorized to use the system. Managing users is done for the purpose of security by limiting access in specific ways. The superuser (root) has complete access to the operating system and its configuration. Root user is intended for administrative use only. Users with less privileges may use the su and sudo programs for controlled privilege escalation. Users may be grouped together into a group, and users may be added to an existing group to utilize the privileged access it grants. Each file has a set of attributes which control who can read or change the file. Those attributes, called file permissions can be changed by users and programs. Additional permissions may be granted using Access Control Lists (ACL).
- Users
- The root user
- Add user - adduser, useradd
- Modify user - usermod
- Add/Change password - passwd
- Delete user - userdel
- Displaying Users
- View details of all users (/etc/passwd and /etc/shadow files)
- View details on single user (id, finger commands)
- Change user password expiry information (chage)
- Change file owner (chown)
- Default values to be assigned to a user when created using useradd
- Groups
- Add group - groupadd
- Delete group - groupdel
- Show all groups - from file /etc/group
- Show members of a specific group
- Assigning Primary groups to users
- Assigning Secondary groups to users
- File Permissions (modes,chmod)
- Access Control Lists (ACL)
- umask - mask that controls how file permissions are set for newly created files
- Sticky bit - avoid deletion of a folder and it’s content by users
- SUID - Set owner User ID up on execution
- Password Configuration file
- Examples
Users
The root user
The root user a special user on each system with unlimited access to the system. This user has username and groupname of root and the numerical uid and gid of 0. This user is required to allow administrative actions that are not granted under the other users and for certain daemons that have full access to the system.
Using adduser to add new user
In this example, the adduser command will create a new user called username and create an empty directory called /home/username. The adduser will also create a group with the same name as the user and assign group to user.
> adduser username
The older useradd command is a similar but less feature rich command. For instance, it does not automatically set up account's home folders and other settings
> useradd username2
Remove user using userdel command. Use -r switch to remove home directory at the same time.
> userdel -r username
Add user bobsmith with common name (-c) "Bob Smith" with and make directory (-d) of /home/bob_smith. Common name (sometimes identified as comment) is usually user's full name. You will have to delete user first if already created above. See userdel command below.
> adduser bobsmith -c "Bob Smith" -d /home/bob_smith
Add user bobsmith with a fixed expiry date.
> adduser -e "2017-01-01" bobsmith
Modify user - usermod
The usermod command is used by an administrator to change a user's system account settings.
Here were modify Bob Smith's common name to Bob W. Smith
> usermod -c "Bob W. Smith" bobsmith
add a new secondary group called "groupname" to user bobsmith. Here we used append (-a) as user may have multiple secondary groups.
> usermod -aG groupname bobsmith
change user bobsmith's primary group to group "groupname"
> usermod -g groupname bobsmith
more on groups later in this section
Create/Change user password.
Create/Change user password. Without a password user cannot login
> passwd bobsmith
Expire password immediately to force user to create new password
> passwd -e bobsmith
Expire password on specific date
> usermod -e "2017-01-01" bobsmith
View/change user password expiry information - chage
Show expiry date of a user.
> chage --list bobsmith
Last password change                                    : Oct 30, 2016
Password expires                                        : never
Password inactive                                       : never
Account expires                                         : Jan 01, 2017
Minimum number of days between password change          : 0
Maximum number of days between password change          : 99999
Number of days of warning before password expires       : 7
Force password change in 90 days
chage -M 90 bobsmith
Delete/Disable user
Use userdel to delete a user
> userdel bobsmith
Delete user and his home directory and mail spool
> userdel -r bobsmith
Sometimes we want to delete a user who happens to be on the system.
>  userdel superman
userdel: user superman is currently used by process 13972
In this case we may ask him to exit, or force (-f) the deletion.
> userdel -f superman
To disable a user account
-in /etc/shadow account, add a star to password hash. This will effectively disable password, while allowing you to re-enable it later
bobsmith:*$6$PVFtwdPY$FDsj6cZCWzoz0qK6kLyo1Fg9qGbVFPinO8r7wVROOCmjeeloE5KgaiLFFhjvVUJkgpRvrA6pNGp.a9tzHHrwZ/:16458:0:99999:7:::
another way to disable a user is by changing /bin/bash to /bin/nologin in /etc/passwd file
> bobsmith:x:1010:1014::/home/superman20:/bin/nologin
View details of one or all users
There are various techniques to view details of one user or all users
View details of all users (/etc/passwd and /etc/shadow files)
The /etc/passwd file stores user information required during login. The /etc/passwd is a text file, that contains a list of the system's accounts, giving for each account some useful information like user ID, group ID, home directory, shell, etc. So to get a list of users we can use the cat command to see contents of this file.
> cat /etc/passwd | more
The /etc/passwd file
To edit passwd file, we can use vi or vim, although generally we do not want to edit this file directly.
vim /etc/passwd
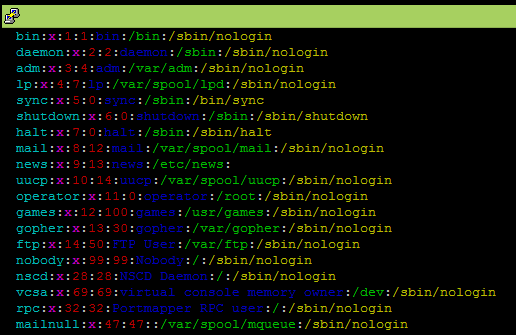
What does this all mean?
daemon:x:2:2:daemon:/sbin:/sbin/nologindaemon = user name
x = shadow file reference - x means that actual password is stored in 'shadow' file
2 = unique user identifier (UID)
2 = GID = unique identifier for groups (GID). By default group name is same as user name.
daemon = common name
/sbin = default home directory. Typically this would be /home/username
/sbin/nologin = default shell. Typically /bin/sh or /bin/bash for human users
view/edit shadow file
The /etc/shadow file stores actual password in encrypted format for user's account with additional properties related to user password. All fields are separated by a colon (:) symbol. It contains one entry per line for each user listed in /etc/passwd file.
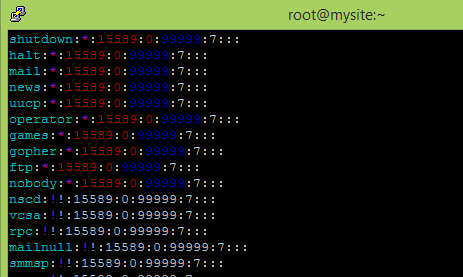
What does this all mean?
root:!!$1$KMLV48Bb$S/piT2ZGMZKoeWDnHXVep1:15666:0:99999:7:::root = login name
!!$1$KMLV48Bb$S/piT2ZGMZKoeWDnHXVep1 = encryped password
15666 = last password change date
0 = maximum number of days the password is valid. zero means unlimited
99999 = number of days after password expires that account is disabled
To get list of Users using grep
list of users, to screen:
> grep -oE '^[^:]+' /etc/passwd
-o tells it to only return the part of the line that matches. -E turns on extended regular expressions so the + will work later. ^ matches the beginning of the line, [^:] matches anything except a colon, and + means as many characters as possible. So this will match the beginning of every line up until the first colon.
To see default values to be assigned to a user when created using useradd
# cat /etc/default/useradd
# useradd defaults file
GROUP=100
HOME=/home
INACTIVE=-1
EXPIRE=
SHELL=/bin/bash
SKEL=/etc/skel
CREATE_MAIL_SPOOL=yes
command to list users and their home directories using awk
> cat /etc/passwd | awk -F: '{print $1," =>", $6}'
mail  => /var/spool/mail
operator  => /root
dbus  => /
postfix  => /var/spool/postfix
bobsmith  => /home/bobsmith
username  => /home/username
...
View details on single user (id, finger commands)
the id command
The id command is command which can print real and effective User ID (UID) and Group ID (GID). An UID is a single identity for a user. While Group ID (GID) can consist of more than one UID.
> id bobsmith
uid=501(bobsmith) gid=501(bobsmith) groups=501(bobsmith),509(anothergroup)
The finger command
The finger displays the user's login name, real name, terminal name and write status (as a ``*'' after the terminal name if write permission is denied), idle time, login time, office location and office phone number. Note that he finger command does not come with standard Red Hat/Installation.
> finger bobsmith
Login: bobsmith                         Name: Bob W. Smith
Directory: /home/bob_smith              Shell: /bin/bash
Never logged in.
No mail.
No Plan.
chage - change user password expiry information
The chage command changes the number of days between password changes and the date of the last password change. This information is used by the system to determine when a user must change his/her password.
Options:
| -d LAST_DAY | set date of last password change to LAST_DAY |
| -E EXPIRE_DATE | set account expiration date to EXPIRE_DATE |
| -I INACTIVE | set password inactive after expiration to INACTIVE |
| -l | show account aging information |
| -m MIN_DAYS | set minimum number of days before password change to MIN_DAYS |
| -M MAX_DAYS | set maximim number of days before password change to MAX_DAYS |
| -R CHROOT_DIR | directory to chroot into |
| -W WARN_DAYS | set expiration warning days to WARN_DAYS |
Change file ownership - chown
File ownership is a way to manage files of different users and share files between users of same groups. Every file in linux is managed by a specific user and a group. Using chown command you can change the ownership of a file and similarly using chgrp you can change the group owner for that file.
Change owner of file1 to user1
chown user1 file1
Change owner of directory /home/user1/ and all sub-directories to owner user1. The -v provides verbose description of changes made.
chown -v -R user1 /home/user1/
Change owner of file1 to user1 and group to group1
chown user1.group1 file1
Groups
Linux groups are a mechanism to manage a collection of users. All Linux users have a user ID and a group ID and a unique numerical identification number called a userid (UID) and a groupid (GID) respectively. GIDs below 500 are reserved for system groups.
Primary and supplemental groups
A new group with the same name as the user is created by default when a new user is created. This new group is referred to as a private (or primary) user group. Apart from the primary group, a user can be a member of another group also, which is known as supplemental groups. Files and devices may be granted access based on a users ID or group ID. File, directory and device (special file) permissions are granted based on "user", "group" or "other" identification statuses.Regular groups vs system groups
There is no inherent difference between system groups and regular or 'normal' groups, just like there is none between system users and regular users. It is by convention that human users are assigned uids from a certain number (e.g. 1000 in RH7) upwards, whereas system users get uids in a range below that number. The actual uid number, apart from the special uid 0 which is reserved for root, has no meaning at all and does not convey any privileges.
To add new group
Add new groups
> groupadd groupname
> groupadd Marketing
> groupadd Sales
> groupadd Accounting
> groupadd Finance
Add a new "regular" (system) group called systemgroup. System groups have uid numbers over 1000.
> groupadd -r systemgroup
To delete a group
Use groupdel to delete a group
> groupdel groupname
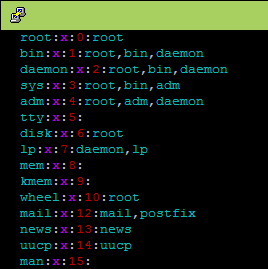
Show all groups
To show list of all groups
> cat /etc/group
or a little bit cleaner...
> cut -d: -f1 /etc/group
Show members of a specific group
The groupmems command allows us to maintain a user's primary group. It also allows us to list members of a specic group.
> groupmems -g shared -l
Assigning primary groups to users
Use lowercase -g when creating users to assign a primary group, then verfify using id command
> adduser -g groupname newuser
> id newuser
uid=1012(newuser) gid=1004(groupname) groups=1004(groupname)
Use usermod -g to change primary group, then verfify using id command
> usermod -g groupname newuser
> id newuser
uid=1012(newuser) gid=1004(groupname) groups=1004(groupname)
We can also use the groupmems command to assign existing user newuser to group groupname.
> groupmems -a groupname -g newuser
... or remove group groupname from user newuser.
> groupmems -d groupname -g newuser
Assigning secondary groups to users
Use usermod command to make existing user a member of an existing group. Use -aG switch to add a new group. In this example, we make user username a member of group groupname. Note that group groupname has to be already created.
> usermod -aG groupname username
Use adduser command to create user and assign user to group at the same time.
Use uppercase -G to assign a secondary group
> adduser -G groupname newuser
> id newuser
uid=1012(newuser) gid=1012(newuser) groups=1012(newuser),1004(groupname)
We can assign multiple groups to a user in a single command by specifying groups with commas.
> adduser -g groupname,groupname2,groupname3 username
Change bobsmith's primary group to accounting
> usermod -g accounting bobsmith
Removing users from groups
There is no command to do this explicitly, however we can use use usermod to remove all secondary/supplementary groups from username, leaving them as a member of only their primary group
> usermod -G "" username
Listing Groups and Users
If we use id command, we can see that user username has primary group groupname. The "gid=" syntax indicates the primary group name.
id username
uid=1014(username) gid=1016(username) groups=1016(username),1020(groupname)
See what groups a user belongs to
# groups username
Show all groups
# cat /etc/group
or
# vim /etc/group
add new primary group to user
# usermod -g username groupname
add new group, removes all other groups
usermod -G sillygroup usename
Remove all groups from a user
usermod -G "" username
Show all members of a group
# getent group somegroup
To show a specific users's groups
# groups usernameExample:
> useradd user1

> groupadd Marketing
> groupadd Sales
> groupadd Accounting
> groupadd Finance

> usermod -aG  Marketing  user1
> usermod -aG  Sales  user1
> usermod -aG  Accounting  user1
> usermod -aG  Finance  user1

> groups user1
output:
user1 : user1 Marketing Sales Accounting Finance
File Permissions (modes,chmod)
Linux has three user classes:
- User (u): The owner of file
- Group (g): Other user who are in group (to access files)
- Other (o): Everyone else
You can setup following mode on each file. In Linux a set of permissions is called a mode.
- Read (r)
- Write (w)
- Execute (x)
However, above three modes or permission have different meaning for file and directory:
Linux Read mode permissions
- Read access on a file allows you to view file
- Read access on a directory allows you to view directory contents with ls command
Write mode permissions
- Write access on a file allows you to write to file
- Write access on a directory allows you to remove or add new files
Execute mode permissions
- Execute access on a file allows to run program or script
- Execute access on a directory allows you access file in the directory
to list files with permissions:
# cd /etc
# ls -l
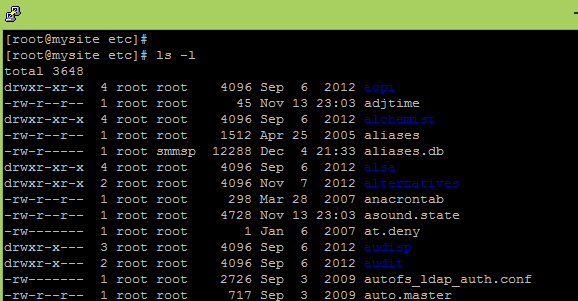
understanding permissions in listing (ls) command
- The 1st character: what kind of object is it; - for file, d for directory, s for socket.
- The 2nd until and including the 4th character: the permissions for the owner of the object.
- The 5th until and including the 7th character: the permissions for the group that owns the object.
- The 8th until and including the 10th character: the permissions for others.
Special rules for directories:
When applying permissions to directories on Linux, the permission bits have different meanings than on regular files.
- The write bit allows the affected user to create, rename, or delete files within the directory, and modify the directory's attributes
- The read bit allows the affected user to list the files within the directory
- The execute bit allows the affected user to enter the directory, and access files and directories inside
- The sticky bit states that files and directories within that directory may only be deleted or renamed by their owner (or root)
Octal numbers and permissions
You can use octal number to represent mode/permission:
- r = 4
- w = 2
- x = 1
| Numeric | Readable | Explanation |
| 0 | /// | No access. |
| 1 | --x | Execute access |
| 2 | -w- | Write access |
| 3 | -wx | Write and execute access |
| 4 | r-- | Read access. |
| 5 | r-x | Read and execute access. |
| 6 | rw- | Read and write access |
| 7 | rwx | Read, write and execute access |
Table of numbers - some common settings
| Value | Meaning |
|
777 |
(rwxrwxrwx) No restrictions on permissions. Anybody may do anything. Generally not a desirable setting. |
|
755 |
(rwxr-xr-x) The file's owner may read, write, and execute the file. All others may read and execute the file. This setting is common for programs that are used by all users. |
|
700 |
(rwx//////) The file's owner may read, write, and execute the file. Nobody else has any rights. This setting is useful for programs that only the owner may use and must be kept private from others. |
|
666 |
(rw-rw-rw-) All users may read and write the file. |
|
644 |
(rw-r--r--) The owner may read and write a file, while all others may only read the file. A common setting for data files that everybody may read, but only the owner may change. |
|
600 |
(rw//////-) The owner may read and write a file. All others have no rights. A common setting for data files that the owner wants to keep private. |
Grant all permissions on file using octal values
chmod 777 myfile
Grant all permissions on file using symbolic values
chmod u=rwx,g=rwx,o=rwx myfile1
Add read and write to user
chmod u+rw myfile1
Change permissions on recursively (directories and files within directories)
chmod 777 mydirectory -R
Change owner of file
chown username myfile
Change owner of a directory recursively
chown -R username mydir
Access Control Lists
Access Control List (ACL) provides an additional, more flexible permission mechanism for file systems. It is designed to assist with Linux file permissions. ACL allows you to give permissions for any user or group to any disc resource.
Installation
The acl package is a dependency of systemd. It should already be installedin Red Hat/Centos 7. In older systems it may have to be installed and implemented as parameter in /etc/fstab file.
Setting Access Control list entries - setfacl
to set ACL for a file/directory use command setfacl
setfacl: some useful switches
  -b, --remove-all        remove all extended ACL entries
  -m, --modify=acl        modify the current ACL(s) of file(s)
  -x, --remove=acl        remove entries from the ACL(s) of file(s)
  -R, --recursive         recurse into subdirectories
give (modify) user user1 read(r) and write(w) permission on file file1 in directory home.
> setfacl -m "user1:rw" /home/file1or
> setfacl -m user1:rw /home/file1
Note that after addings permission, we will see a plus (+) sign in the litsing:
> ll
-rw-rw-r--+ 1 root     root       0 Nov 16 18:35 file1
Display Access Control list entries - getfacl
Using the getfacl command will show us these additional permissions
> getfacl  /home/file1
getfacl: Removing leading '/' from absolute path names
# file: home/file1
# owner: root
# group: root
user::rw-
user:user1:rw-
group::r--
mask::rw-
other::r--
ACL - examples
deny all permissions to user1 using minus sign(-)
> setfacl -m user1:- /home/file1
give group group1 read, write and execute permissions on dir1
> setfacl -m g:group1:rwx /home/file1
give user user1 read, write and execute permissions on directory /home/dir1/
> setfacl -R -m u:user1:rwx /home/dir1
delete an entry from access list
> setfacl -x u:user1 /home/dir1/file1
remove all special ACL permission entries on /home directory
> setfacl -bR /home/
umask - mask that controls how file permissions are set for newly created files.
The umask command determines the settings of a mask that controls how file permissions are set for newly created files. The mask is a grouping of bits, each of which helps control how its corresponding permission is set for newly created files. The bits in the mask may be changed by invoking the umask command.
To see current umask value:
umask -S
To set umask for a specific set of requirements
Determine permissions required for each user (owner, group, other)
4 read
2 write
1 execute
Determine permission value, then subtract 7 from this value to get umask value
Example to get umask for the following requirements:
- owner: read/execute/write
- group: read/execute
- other: read
Subtract to get permissions of new directory (777-754)
> umask 023
to test changes, I create a file called testfile.txt and examine its priviledges. Note that because shells will not set file execute bit by default, as a security precaution, you may not see what you expected. In each case I am missing the execute priviledges. These have to be added manually.
> echo x > testfile.txt
> ll | grep testfile.txt
  -rw-r--r--.  1 root   root           4 Jun 26 01:15 testfile.txt
Sticky bit (chmod +t)
The Sticky Bit is used for directories to protect files within them. Files in a directory with the sticky bit set can only be deleted or renamed by the root user or the owner of the directory. The sticky bit permission symbol is t. The sticky bit shows up as a t in the execute position of the other permissions. This is a security measure to avoid deletion of critical folders and their contents (sub-folders and files), though other users have full permissions. A program with read and execute permissions with the sticky bit has its permissions displayed as r-t.
> chmod +t /home/mydir
or
> chmod o+t /home/mydir
The sticky bit will show up as a t in the last position or rights
>ls -l
dr-xr-xr-t. 2 root  root  89 Aug  9 20:58 mydir
Small t represent that execute permission also enable and capital T represent that execute permission are not enabled.
I can edit the file in mydir, but if I try to delete I get this error
rm: cannot remove ‘test’: Permission denied
SUID (Set owner User ID on execution), SGID (Set-group identification on execution)
The SUID (Set owner User ID up on execution) and SGID (Set-group identification on execution) are special types of file permissions given to a file or directory. Normally in Linux when a program runs, it inherits access permissions from the user logged in. SUID is defined as giving temporary permissions to a user to run a program/file with the permissions of the file owner rather that the user who runs it. In simple words users will get file owner’s permissions as well as owner UID and GID when executing a file/program/command.
We see this technique used in commands such as passwd. In the example below, we see passwd the SUID set such that any user can execute it as though he is the owner of the command
> ll /usr/bin/passwd
-rwsr-xr-x. 1 root root 27832 Jun 10  2014 /usr/bin/passwd
In example below, note that owner's execute flag is set to "s" (SUID). All users wil inherit owners's permissions when program is run.
ll /usr/bin/passwd

-rwsr-xr-x. 1 root root 27832 Jun 10  2014 /usr/bin/passwd
IN the example below, the passwd command is set with SUID to give root user permissions to normal user so that it can update /etc/shadow and other files. If you see capital S, it indicates that the file/folder does not have executable permissions for that user on that particular file/folder.
to change SUID
chmod u+s file1.txt
chmod g+s file1.txt
Here the 4 indicates SUID
chmod 4750 file1.txt
find all files with SUID set
find / -perm /6000 -type f
Password configuration file
The /etc/login.defs file defines the site-specific configuration for the shadow password suite. This file is required. This file is a readable text file, describing configuration parameters.
Here are a few interesting settings:
Password minimum length and expiry requirements
PASS_MAX_DAYS   99999
PASS_MIN_DAYS   0
PASS_MIN_LEN    5
PASS_WARN_AGE   7
Should new user automatically get home directory?
CREATE_HOME yes
This is a complete sample of file /etc/login.defs
> cat /etc/login.defs
#
# Please note that the parameters in this configuration file control the
# behavior of the tools from the shadow-utils component. None of these
# tools uses the PAM mechanism, and the utilities that use PAM (such as the
# passwd command) should therefore be configured elsewhere. Refer to
# /etc/pam.d/system-auth for more information.
#

# *REQUIRED*
#   Directory where mailboxes reside, _or_ name of file, relative to the
#   home directory.  If you _do_ define both, MAIL_DIR takes precedence.
#   QMAIL_DIR is for Qmail
#
#QMAIL_DIR      Maildir
MAIL_DIR        /var/spool/mail
#MAIL_FILE      .mail

# Password aging controls:
#
#       PASS_MAX_DAYS   Maximum number of days a password may be used.
#       PASS_MIN_DAYS   Minimum number of days allowed between password changes.
#       PASS_MIN_LEN    Minimum acceptable password length.
#       PASS_WARN_AGE   Number of days warning given before a password expires.
#
PASS_MAX_DAYS   99999
PASS_MIN_DAYS   0
PASS_MIN_LEN    5
PASS_WARN_AGE   7

#
# Min/max values for automatic uid selection in useradd
#
UID_MIN                   500
UID_MAX                 60000

#
# Min/max values for automatic gid selection in groupadd
#
GID_MIN                   500
GID_MAX                 60000

#
# If defined, this command is run when removing a user.
# It should remove any at/cron/print jobs etc. owned by
# the user to be removed (passed as the first argument).
#
#USERDEL_CMD    /usr/sbin/userdel_local

#
# If useradd should create home directories for users by default
# On RH systems, we do. This option is overridden with the -m flag on
# useradd command line.
#
CREATE_HOME     yes

# The permission mask is initialized to this value. If not specified,
# the permission mask will be initialized to 022.
UMASK           077

# This enables userdel to remove user groups if no members exist.
#
USERGROUPS_ENAB yes

# Use SHA512 to encrypt password.
ENCRYPT_METHOD SHA512
Examples
Example 1 - Create shared directory amoung group - allow create but not delete
- Setup a /home/shared directory to facilitate collaboration among the shared group.
- Create two members (user1 and users2) of group shared.
- Each member should be able to create files and modify each others’ files, but should not be able to delete any one else’s files in this directory.
Answer
# create a new group called shared
groupadd shared

# make a new directory for users to share
mkdir /home/shared

# new directory /home/shared should be owned by root user but have group shared
chown root:shared /home/shared

# give all rights to owner and group
chmod 770 /home/shared

# add sticky bit. This will prevent delete of contents by user other than owner
chmod +t /home/shared

# Set Group ID - makes all new files and subdirectories
# created within the current directory inherit the
# group ID of the directory, rather than the primary group ID of the
# user who created the file.

chmod g+s /home/shared

# create two new users with passwords

adduser user1
passwd user1

adduser user2
passwd user2

# make new users belong to group shared
usermod -aG shared user1
usermod -aG shared user2
To test above recipe, log in to system as user1 and create a file in home/shared. Try to delete this file. You should not be able to. Next log in as user2 and try to edit and delete. Then log in as user3. Users3 should not be able to access the directory at all.
To clean up and remove above changes:
userdel user1
userdel user2
userdel user3

rm -rf /home/shared
rm -rf /home/user1
rm -rf /home/user2
rm -rf /home/user3

groupdel shared
Example 2 - create user newuser and make his account expire in one week
Create a user whose profile expires on specific day
adduser -e 2017-02-03 newuser
Verify that it works
>  chage -l newuser
Last password change                                    : Dec 18, 2017
Password expires                                        : never
Password inactive                                       : never
Account expires                                         : Feb 03, 2017
Minimum number of days between password change          : 0
Maximum number of days between password change          : 99999
Number of days of warning before password expires       : 7
# determine the date in one week
date -d "+1week"
if you change your mind, and want to change it again
> usermod -e YYYY-MM-DD newuser
or
chage -E YYYY-MM-DD newuser