IBM i Work Management
Objectives of this Document
This guide is designed to give you basic understanding of IBM i work management and operations.
Note that this discussion contains many useful, but equally dangerous commands. As you are likely working on a system that is used by other developers or by a business without adequate safeguards to prevent you from messing up, please remember that any modifications or deletions of objects may jeopardize system integrity or performance.
The Object
On the IBM i everything worth talking about is an object. This is not an 'object', in the object-oriented sense of the word. People more familiar with Windows/DOS or Linux/Unix can replace the word object with the word 'file' or 'thing' if it makes you more comfortable. You will notice that IBM i people will go on and on about their objects.
For instance, if you want to see all the objects in libary QSYS, type
WRKOBJ OBJ(QSYS/*ALL)
	                               Work with Objects

 Type options, press Enter.
   2=Edit authority        3=Copy   4=Delete   5=Display authority   7=Rename
   8=Display description   13=Change description

 Opt  Object      Type      Library     Attribute   Text
      QADVSEC     *LIB      QSYS        PROD
      QCA400W     *LIB      QSYS        PROD
      QCBL        *LIB      QSYS        PROD
      QCBLLE      *LIB      QSYS        PROD
      QCBLLEP     *LIB      QSYS        PROD
      QCPPLE      *LIB      QSYS        PROD
      QANZAGENT   *USRPRF   QSYS                    Trace Analyzer Agent Server
      QAUTPROF    *USRPRF   QSYS                    IBM-supplied User Profile
      QBRMS       *USRPRF   QSYS                    IBM-supplied User Profile
      QCLUMGT     *USRPRF   QSYS                    IBM-supplied User Profile
      QCLUSTER    *USRPRF   QSYS                    IBM-supplied User Profile

                                                                        More...
 Parameters for options 5, 7 and 13 or command
 ===>
 F3=Exit   F4=Prompt   F5=Refresh   F9=Retrieve   F11=Display names and types
 F12=Cancel   F16=Repeat position to   F17=Position to
An object is made up of a set of attributes that describe the object and some form of data. The attributes of an object include its name, type, size, the date it was created, a short description, and the name of the library in which it is stored.
There are dozens of objects types on the IBM i including commands, controllers, data areas, device descriptions, files, line descriptions, menus, output queues, programs and user profiles.
The Library
All IBM i objects are organized into libraries. Each object must belong to a library. Even libraries belong to a special library called the QSYS library. An object can belong to only one library. IBM i libraries are organized as a single-level hierarchies, unlike the directory structure found in Windws and Linux which may have multilevel hierarchies.
Windows/DOS or Linux files, such as the examples below, may be referenced within a multilevel hierarchy featuring directories and subdirectories.
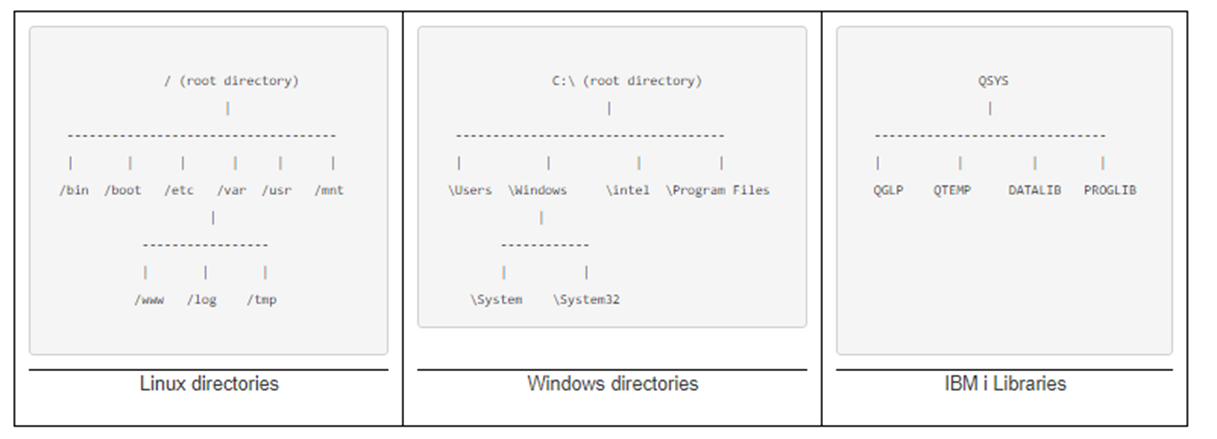
The IBM i comes with several default libraries. Default libraries (and all default IBM object begin with the letter "Q"). The QSYS library contains the base operating system components, as well as other libraries. It is special in that it is the only library that can contain other libraries. Here are a few common libraries
QSYS - System Parent Library
QSYS2 - System Library for CPI's
QHLPSYS - Online Documentation Library for Users
QTCP - TCP Connectivity Utilities
QAFP - Advanced Function Printing
QGPL - General Purpose Library
QTEMP - Job specific temporary Library (deleted when the job ends)
To uniquely identify an object on IBM i, we need both the library the object names. The IBM i identifies objects by their qualified name, which takes the form of LIBRARY/OBJECT. For example, to accurately refer to the object VENDOR in the library APLIB you would reference this as APLIB/VENDOR. Two or more objects can have the same name but they must be different types of objects. For example you could have a program named TEST and a data area named TEST, but not two programs named TEST in a single library.
IBM i libraries and file names are limited to 10 characters.
The Library List
The Library List is the list of libraries within scope at any given time. The Library List is similar to the concept of path in Linux or Windows.
If an object is within scope of the Library List, them the object can be referenced with a relative reference. In the following example, we call a program by name, without using the qualifying library name
CALL MYPGM
If an object is not in the Library List it has to be referenced with an absolute reference that explicitly identifies the library. Example:
CALL MYLIB/MYPGM
You are permitted 25 libraries in the User Portion of the library list. Later versions of the OS have increased this to 250. Library lists can be changed with the folling commands
 EDTLIBL                               Edit library list
 ADDLIBLE NEWLIB                       Add a new library called NEWLIB to the library List
 CHGLIBL                               Change the whole library list
 CHGSYSLIBL                            Change System Library List
 DSPLIBL                               Display Library List
 EDTLIBL                               Edit Library List
 RMVLIBLE                              Remove Library List Entry
These commands are only applicable for the current session. When you exit the session library list will be lost
Types of Files
On the IBM i, data is arranged into data files. The IBM i has many different types of files. These include Physical files (tables), Logical file (indexes), Printer files, Save files. The physical (or data file) is similar to the SQL table on other systems.To see all of the files on your system:
WRKOBJ OBJ(*ALL) OBJTYPE(*FILE)
When you run this command, note that your files come with different attributes See if you can spot these types of files below Physical files(PF), Logical Files (LF), Printer files (PRTF), Display Files(DSPF), Tape Files (TAPF), Save Files (SAVF).
	                        Work with Objects

	 Type options, press Enter.
	   2=Edit authority        3=Copy   4=Delete   5=Display authority   7=Rename
	   8=Display description   13=Change description

	 Opt  Object      Type      Library     Attribute   Text
     __   QADSPAUD    *FILE     QSYS        PF          System supplied outfile for
     __   QADSPAUP    *FILE     QSYS        PF          System supplied outfile for
     __   QAMOPVT1    *FILE     QSYS        LF          OPTICAL PVR LOGICAL VIEW 1
     __   QAMOPVT2    *FILE     QSYS        LF          OPTICAL PVR LOGICAL VIEW 1
     __   QAS9CEEVT   *FILE     QSYS        DSPF
     __   QCRFDWNL    *FILE     QSYS        ICFF
     __   QPTMPLPD    *FILE     QUSRSYS     PRTF        TCP/IP LPD SERVER PRINTER F
     __   QTAPE       *FILE     QGPL        TAPF        Default tape data device fi
     __   ZENDPHP7    *FILE     QGPL        SAVF        ZEND SERVER 9 PRODUCT SAVF
                                                                              More...
	 Parameters for options 5, 7 and 13 or command
	 ===>
	 F3=Exit   F4=Prompt   F5=Refresh   F9=Retrieve   F11=Display names and types
	 F12=Cancel   F16=Repeat position to   F17=Position to   F24=More keys
Physical Files
The IBM i Physical File, often called simply File or Data File, contains the actual data that is stored on the system, and a description of how data is to be presented to or received from a program.
The Physical File is equivalent to an SQL Table. It may be defined using the propriatory IBM DDS (Data Description Language) or standar SQL DDL language. On the IBM i, a Physical File can be placed in any library on the system. Placement of Physical Files does not have rigid rules often found on Linux and DOS/Windows databases. Physical Files are identified by their name and library. They also have a record format. They may have key field(s). Data may be unique be unique on the keyed field.
A physical file actually has two parts. The first part contains the file attributes and field descriptions. The file attributes include the file’s name, owner, size, number of records in the file, key fields, and other attributes. The field descriptions hold the attributes for each field in the record. The second part of a physical file contains the data.
This is what a DDS file definition looks like:
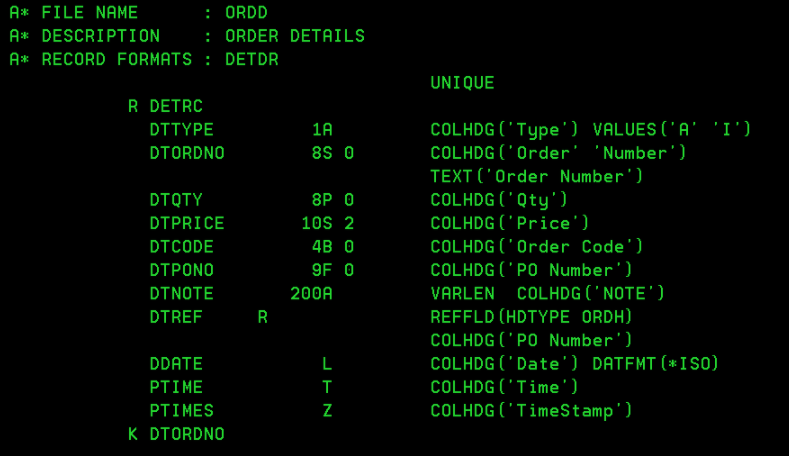
What to take note of here:
- Record Format DETRC
- Keyed (K) on DTORDNO
- Primary Key DTORDNO because of combination of Key and work UNIQUE
- Use of different data types including AlphaNumeric, Signed Numeric, Packed Numeric, Binary, Float, Date, Time and TimeStamp
Physical File Members
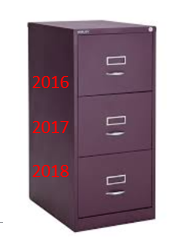
Physical files contain physical file members. A physical file may have zero, one or multiple members. Each member within a file would have identical structure, but may contain different data. New members may be created to isolate data by company grouping (divsion, department) or over time (month, year). You can think of a Physical File Members as drawers in a filing cabinet. Each drawer is the same size but likely contains different data.
In the past, businesses created multi-membered files, often adding a new member each month or for each division, to manage storage limitations and disk access speeds. Today, these concerns are outdated due to advancements in storage capacity and speed. Moreover, multi-membered files are incompatible with SQL standards. Consequently, most vendors have switched to single-membered files, simplifying data management and aligning with modern SQL practices.
Normally, physical files have only one member which, by default, is added to the file when the file is created. Each member of a physical file has a single access path.
To add more complexity to the subject, a physical file may have multiple record types. Each record type may have a different structure. Typically record types were used to store a transaction headers and details in the same physical file. For example, Invoice headers may be stored in RECHEAD and each header line would have the leading character '8'. Invoice details would be stored RECDET and contain the leading character of '9'. This is a very old practice dating back to the days of punch cards! Multiple records is very rare and indefensible these days but every programmer is likely to stumble over this in legacy code.
Logical Files
The Logical file is a special type of file used to help programs access physical file data more quickly. Logical files are a linked to one or more physical file. They are similar to SQL concepts of indexes and sometimes closer to SQL views. They provide facility to 1) select columns 2) join tables, as well as 3) order rows (sort).
Logical Files combine the features of both SQL Views (column selection and table joining) and SQL Indexes (row ordering). They usually function as an Index. Logical files can also have select/omit statements, which filter which rows of the PF.
The differences between iSeries file/logicals and standard SQL tables/indexes is related to the fact, that IBMs DB2/400-system was created a long time ago when SQL was a still in development and had not yet been implemented in a commercial system. IBM has come a long way in supporting both its legacy file formats as well as SQL table on the IBM i, but there are differences and challenges to overcome in bridging the two.
Some useful commands to learn about files and objects
WRKOBJ - Work with ObjectDSPOBJD - Display Object Description
DSPDBR - Display Database Relations
DSPFFD - Display File Field Description
DSPFD - Display file Description
DSPPGMREF - Display Program References
What is Work Management?
Our discussion of Work Management has nothing to do with DayTimers or staying in the office to 6 PM .
Work Management in the IBM i context refers to the functions that control the IBM i's workload and distribute resources among all its jobs. Work management defines a job's environment: where it enters the system, what resources it uses for processing, and where its output goes.
Because IBM ships all IBM i systems with all tools necessary to run typical operations. This may be why it is often over-looked and under emphasized in many companies. However if you understand work management, you know what effects the various pieces of the system, and how to change them so they operate more efficiently.
IBM i Commands
The IBM i native command language is called CL (Command Language). Like Windows/DOS and Linux batch files, most CL commands can be run at the command line or strung together in a batch file. Unlike Windows/DOS and Linux, batch files on the IBM i are compiled.
What does the IBM i Command line look like? Here is one below:
 ===>___________________________________________________________
    F3=Exit F4=Prompt F5=Refresh F12=Cancel F24=More keys
The IBM i has a very rich vocabulary of commands covering a diversity of tasks including file management, backup, scheduling, security, printing, communications, device configuration and much more. One of the reasons that the IBM i was very popular in small and medium businesses, is that it does not require many add-on or third party packages to perform basic operating systems functions. Most of the tools you need are included with the operating system.
In general, IBM i commands are more consistently constructed compared to other operating systems. IBM i commands like English sentences are generally composed of at least a verb and a subject portion and often an object
Examples of verb segments:
WRK (work with), CRT (create), DLT (delete), CHG (change), DSP (display)
Example of subject segments:
PGM (program), LIB (Library), OBJ (Object), JOB (Job)
Often you can combine the verbs and nouns and simply guess the commands.
For example: CRTLIB or DLTLIB.
GO MAJOR
If you have not already used it, try the IBM i menu Command GO MAJOR. GO MAJOR is an on-line index of most IBM i commands. (Press F4 at the command line will get you there as well.) The commands are indexed in several handy ways including by verb and by subject.
    -----------------------------------------------------------------
    MAJOR Major Command Groups System: SYS23
    Select one of the following:

    1. Select Command by Name SLTCMD
    2. Verb Commands VERB
    3. Subject Commands SUBJECT
    4. Object Management Commands CMDOBJMGT
    5. File Commands CMDFILE
    6. Save and Restore Commands CMDSAVRST
    7. Work Management Commands CMDWRKMGT
    8. Data Management Commands CMDDTAMGT
    9. Security Commands CMDSEC
    10. Print Commands CMDPRT
    11. Spooling Commands CMDSPL
    12. System Control Commands CMDSYSCTL
    13. Program Commands CMDPGM
    More...
    Selection or command
    ===>___________________________________________________________
    F3=Exit F4=Prompt F9=Retrieve F12=Cancel F13=Information Assistant
    F16=IBM i Main menu
When unsure of a command, type the first few characters followed by the wild card star. This will give you all commands that begin with the prefix specified. For example DSP* will prompt the operating system to enumerate all commands that begin with DSP such DSPSBSD and DSPOBJD.
On CL commands (and elsewhere), the F4 key is the prompt key. It shows a screen that prompts you for all the possible parameters you might want to enter for a command. Example: Type 'SBMJOB' and then hit F4. The system will prompt you for values. Some fields are blank and you must fill them in, others are filled in with default values for you. Note that for many commands, the F10 key will give you additional (and more obscure) option(s).
Here is the CPYF (copy file command) before and after pushing F4:
    Selection or command
    ===> CPYF FROMFILE(MYLIB/MYFILE) TOFILE(YOURLIB/YOURFILE)
 	                      Copy File (CPYF)

    Type choices, press Enter.

    From file . . . . . . . . . . .>  MYFILE     Name
    Library . . . . . . . . . . . >   MYLIB      Name, *LIBL, *CURLIB
    To file . . . . . . . . . . . .>  YOURFILE   Name, *PRINT
    Library . . . . . . . . . . . >   YOURLIB    Name, *LIBL, *CURLIB
    From member . . . . . . . . . .  *FIRST      Name, generic*, *FIRST, *ALL
    To member or label . . . . . . . *FIRST      Name, *FIRST, *FROMMBR
    Replace or add records . . . . . *NONE       *NONE, *ADD, *REPLACE...
    Create file . . . . . . . . . .  *NO         *NO, *YES
    Print format . . . . . . . . . . *CHAR       *CHAR, *HEX

    Bottom
    F3=Exit F4=Prompt F5=Refresh F10=Additional parameters F12=Cancel
    F13=How to use this display F24=More keys
The F1 key is a context sensitive help which is often helpful. Pushing F1 two times will give you the "How to Use Help" screen which contains some explanation on commonly used function keys.
The IBM i Input-Processing-Output Model
On the IBM i, the classic data processing "Input-Processing-Output" model usually looks something like this -
JOBQ >>>> SBS >>>> OUTQ
where the Job Queue (JOBQ) receives the work, the Subsystem (SBS) processes the work and delivers the results to the specified Output Queue (OUTQ).
The Job
A job on the IBM i is the smallest unit of work. Well actually since somewhere around V4, jobs can be broken into multiple threads, but I won’t go into that here.
The Subsystem
On the IBM i, all jobs run in a Subsystem. Subsystems are the "staging ground" for all work performed on the IBM i. Each Subsystems is described in a subsystem description object. Some standard IBM i Subsytems include:
|
QBASE |
Basic Subsystem, (primary subsysten on smaller CPUs) |
|
QINTER |
For interactive jobs |
|
QCTL |
Controlling subsystem |
|
QCMN |
Communication jobs |
|
QPGMR |
For programmer's batch jobs |
|
QSPL |
Printer spooling jobs |
| QBATCH | Batch jobs |
Custom subsystems can be added by the system administrator. They are usually added for tasks that have special system needs. High priority tasks such as billing or the customer service may have their own dedicated subsystem. Lower priority tasks may be submitted into the common QBATCH Subsystem.
When a Subsystem is created, parameters include the maximum number of jobs to run in the Subsystem, and how the Subsystem uses defined "pools" of system memory.
A Subsystem has to be started in order for jobs to run in the subsystem. They also have to be free of messages to function properly. Sometimes Subsytems are brought down during system backups or system maintenance and are not re-started. The command WRKSBSD will tell you if the subsystem is started. The Command WRKACTJOB will show you if a subsytem in has any messages waiting. (More on WRKACTJOB later)
Note the Q prefix on each of these Subsystem names. Note that all IBM objects begin with the letter Q. It is considered bad practice to create objects that begin with the letter Q.
Here are some useful Subsystem Commands
|
DSPSBSYSD |
Display subsystem description |
|
WRKSBS |
Work with subsystems |
|
WRKSBSD |
Work with subsystem description |
|
WRKSBSJOB |
Work with subsystem jobs |
|
ENDSBS |
End subsystem |
|
STRSBS |
Start subsystem |
|
CHGSBSD |
Change subsystem description |
|
DSPSBSD |
Display subsystem description |
The subsystem description includes general definitions as well as Storage Pool definitions. The General Definition includes the Subsystem Name, Description and Maximum number of Jobs that can run in the subsystem.
The Storage Pool attributes determine how the subsystem uses memory for work. The Storage Pool can be:
1) Shared with other subsystems
2) A private pool can be set up for the jobs to be run in
3) Or both a shared and private pools can be setup
The storage pool definition also sets the maximum number of jobs to be run in the respective pools.
Shared or Private Subsystems:
Shared subsystems are the most efficient because more than one subsystem can use the storage pool. If you have limited main storage this is the best choice. Private subsystems reserve storage so that activity levels will remain constant for the users of the subsystem. Share/private subsystems may give you the advantage of both if you have enough main storage.
The Job Queue (JOBQ)
The job queue is the place where jobs wait in line for processing. The IBM i typically makes use of both batch and interactive jobs. Batch jobs are those jobs that get submitted in a queue, gets processed when resources are available, and stores the output in a file or output queue for future reference. Batch jobs are submitted into one of an IBM i job queues. Interactive jobs tend to have a human user waiting for a quick reply. Interactive jobs run directly in the QINTER subsystem. Interactive jobs do not have to wait in line for system resources to become available.
If you CALL a program interatively, (eg: CALL MYLIB/MYPROG) it runs on your screen during its excecution and run in the Subsystem QINTER.
If you wish to submit a program to batch, then use the SBMJOB command.
A typical SBMJOB will look like this:
SBMJOB CMD(CALL PGM(MYLIB/MYPROG)) JOB(MYJOBNAME)
Other ways of submitting a job to a job queue.
|
STRDBRDR |
Start Database Reader |
| STRDKTRDR | Start Diskette Reader |
| STRPRTWTR | Start Printer Writer |
| SBMDBJOB |
Submit Database Jobs |
| TFRJOB | Transfer Job |
The Create Job Queue (CRTJOBQ) command creates a new job queue. A job queue contains entries for jobs that are waiting to be processed by the system. After you create a new job queue, you must add an entry for it in the appropriate subsystem description. To do this use the Add Job Queue Entry (ADDJOBQE) command.
The Output Queue
On the IBM i, whenever a report is printed, the output goes to an output queue as a spooled file. A spooled files is a member of an output queue. The spooled file stays in the output queue until it is directed to a printer or removed. Usually there is an output queue associated with each printer.
Here are some Output Queue Commands:
|
Create Output Queue |
CRTOUTQ |
|
Clear Output Queue |
CLROUTQ |
|
Delete Output Queue |
DLTOUTQ |
|
Hold Output Queue |
HLDOUTQ |
|
Work with Output Queue |
WRKOUTQ |
The Work with Output Queues (WRKOUTQ) command allows the user to display and work with either some or all output queues.
                Work with All Output Queues
Type options, press Enter.
2=Change 3=Hold 4=Delete 5=Work with 6=Release 8=Description
9=Work with Writers 14=Clear

Opt Queue     Library  Files Writer     Status
__ INVOICE    QGPL     0     INVPRT       RLS
__ NEWYORK    QGPL     0     NYPRT        RLS
__ PGMRMV     QGPL     0                  RLS
__ QDKT       QGPL     0                  RLS
__ QPRINT     QGPL    25                  RLS
__ QPRINTS    QGPL    34                  RLS
__ QPRINT2    QGPL     0                  RLS
__ RDAYEND    QGPL    11                  RLS
__ ROUTQ      QGPL     0                  RLS
__ ROUTQ      QGPL     1                  RLS
__ BOB        QGPL     0                  RLS
                                                    More...
Command
===>___________________________________________________________
F3=Exit F4=Prompt F5=Refresh F12=Cancel F24=More keys
Work with Active Jobs
The Work with Active Jobs (WRKACTJOB) command displays the performance and status information for jobs that are currently active on the system.
The jobs are ordered on the basis of the subsystem in which they are running. Jobs that run in a subsystem are alphabetized by job name and indented under the subsystem monitor job field they are associated with.
Pressing F5 and F10 on this screen helps monitor CPU usage. A job with high CPU usage over a prolonged period may be characteristic of a job that has gone into an infinite loop.
                    Work with Active Jobs                SYS2
                                             18/01/01 23:40:08
CPU %: 54.6      Elapsed time: 00:15:47       Active jobs: 167

Type options, press Enter.
2=Change 3=Hold 4=End 5=Work with 6=Release 7=Display message
8=Work with spooled files 13=Disconnect ...

Opt Subsystem/Job User   Type   CPU % Function Status
__  BILLING       QSYS   SBS   .0               DEQW
__  DISTRIBUTION  QSYS   SBS   .0               DEQW
__  QBATCH        QSYS   SBS   .0               DEQW
__  APPDAYEND     ENDDAY BCH 53.7 IDX-LBI1205P  RUN
__  QCMN          QSYS   SBS   .0               DEQW
__  QCTL          QSYS   SBS   .0               DEQW
__  QSYSSCD       QPGMR  BCH   .0 PGM-QEZSCNEP  EVTW
__  QYPUMON       HARSHA BCH   .0 PGM-QYPUDQMN  DEQW
__  QINTER        QSYS   SBS   .0               DEQW
More...
Parameters or command
===>___________________________________________________________
F3=Exit F5=Refresh F7=Find F10=Restart statistics
F11=Display elapsed data F12=Cancel F23=More options F24=More keys
There is a great deal of useful information in this screen and associated screens. Note the column at left that allows an option next to a job. Option "5=Work With" allows you to drill down into an active job and retrieve information including library list, open files and job log.
                                           Work with Job
                                                    System: SYS2
Job: BILLING        User: QSYS       Number: 022216

Select one of the following:

1. Display job status attributes
2. Display job definition attributes
3. Display job run attributes, if active
4. Work with spooled files

10. Display job log, if active or on job queue
11. Display call stack, if active
12. Work with locks, if active
13. Display library list, if active
14. Display open files, if active
15. Display file overrides, if active
16. Display commitment control status, if active
                                                         More...
Selection or command
===>___________________________________________________________

F3=Exit F4=Prompt F9=Retrieve F12=Cancel
Journaling on the IBM i
Journaling on the IBM i system is a mechanism for tracking changes to database files. It allows for the capture of before and after images of records and logs changes made to a file. This is useful for audit purposes, data recovery, and replication. Here are the steps to set up and manage journaling on an IBM i system:
Setting up Journal Receiver & Journal
1. Create a Journal Receiver:
A journal receiver is a storage object that holds journal entries,
which are records of changes made to database files and other objects that are being journaled.
CRTJRNRCV JRNRCV(MYLIB/MYJRNRCV)
2. Create a Journal:
This command creates a journal and associates it with a specified journal receiver.
The journal will then record changes to files that are journaled to it. A journal may track multiple files.
CRTJRN JRN(MYLIB/MYJRN) JRNRCV(MYLIB/MYJRNRCV)
3. Start/end Journaling a File:
STRJRNPF FILE(MYLIB/CUSTOMER) JRN(MYLIB/MYJRN)
ENDJRNPF FILE(MYLIB/CUSTOMER) JRN(MYLIB/MYJRN)
Working with Journal Receivers & Journals
Display Journal Receiver Attributes:
DSPJRNRCVA JRNRCV(MYLIB/MYJRNRCV)
Work with Journal Attributes
WRKJRNA JRN(MYLIB/MYJRN)F17=Display attached receiver attributes
F19=Display journaled objects
Display Journal Entries:
Can output to screen, printer file or data file
DSPJRN JRN(MYLIB/MYJRN)
example:
DSPJRN JRN(MYJRN) FILE((CUSTOMER))
JRNCDE((R)) OUTPUT(*OUTFILE)
OUTFILFMT(*TYPE4) OUTFILE(QTEMP/JRN_OUT)
ENTDTALEN(*CALC)
Apply Journaled Changes Use the APYJRNCHG command to apply journal changes from the restored journal receiver to the appropriate file. This command replays journal entries that were recorded since the backup of the journal receiver.
APYJRNCHG JRN(journal-library/journal-name) FILE(file-library/file-name) RCVRNG(receiver-range-library/receiver-name) FROMENTDT(yymmdd) TOENTDT(yymmdd)