Creating a new block and adding it to page with local.xml
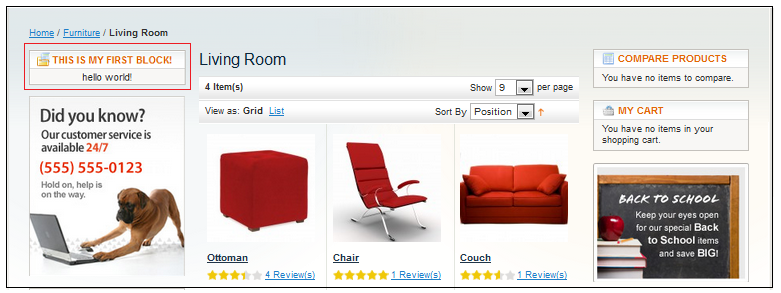
In this exercise, we will create a brand new block and add it to the product category pages using Magento XML layout syntax. The block will simply say hello world! It will be styled with a few standard Magento css classes and be placed on the top of the left column of all product category pages.
To add a text template to a view in magento, you need to consider three aspects
- The template block (a .phtml file)
- The block, or layout, in which the template will reside
- The layout .xml configuration
First create a block in \app\design\frontend\default\mytheme\template\helloworld\myblock.phtml. Note that I have created a custom theme at this point called mytheme. If you have not created your custom theme, it is time to do so! Creating a custom theme is beyond the scope of this article, however there are good explanations of the process at www.fishpig.co.uk and magentocommerce.com
.<div class='block block-list'> <div class='block-title dashboard'> <strong> <span> <img src='../../skin/frontend/default/default/images/i_folder-table.gif'/> This is my first block! </span> </strong> </div> <div class='block-content'> <center><?php echo "hello world!"; ?></center> </div> </div>
In order to target where we want to put our block we have to target the correct layout handle.
We can put the block on all product category pages by using catalog_product_view handle or on the product detail pages by using the catalog_product_view handle, or on the checkout page by using the checkout_onepage_index handle.
in \app\design\frontend\default\mytheme\layout\local.xml, add the following code.
<?xml version="1.0" encoding="UTF-8"?>
  <layout>

	 <!-- put in left column of category pages -->
	 <catalog_category_default translate="label">
	   <reference name="left">
		 <block  type="core/template"
			before="-"
			name="mytheme.template"
			template="helloworld/myblock.phtml" />
	  </reference>
	</catalog_category_default>

	<!-- put in right column of product pages -->
	<catalog_product_view translate="label">
	   <reference name="right">
		 <block  type="core/template"
			before="-"
			name="mytheme.template"
			template="helloworld/myblock.phtml" />
	  </reference>
	</catalog_product_view>


	<!-- put in right column of checkout page -->
	<checkout_onepage_index translate="label">
	   <reference name="right">
		 <block  type="core/template"
			before="-"
			name="mytheme.template"
			template="helloworld/myblock.phtml" />
	  </reference>
	</checkout_onepage_index>

</layout>
Alternatively we can drop the layot instructions directly into an existing template file.
In \app\design\frontend\default\mytheme\layout\catalog.xml, after
<block type="core/template" name="mytheme.template" template="helloworld/myblock.phtml">
Either method will permit us to add custom content blocks to the exact location(s) that we want to see them.
Block to List all product categories
Here is a variation of the above example. In this case the block is a bit more complicated and more useful than a simple hello world message. This example creates a block that shows a list of all product categories. We will position the block at the top of the Edit Account Information page by rargetting the customer_account_edit layout handle.
First we need to create the block.
in \app\design\frontend\base\default\template\mytheme\categories.phtml
<?php
$cats = Mage::getModel('catalog/category')->load(3)->getChildren();
$catIds = explode(',' , $cats);
?>
<div class='block block-list'>
<div class='block-title'><strong><span>Goto Category</span></strong></div>
<div class='block-content'>
<ul>
<?php foreach($catIds as $catId): ?>
<ul>
<?php
$category = Mage::getModel('catalog/category')->load($catId);
echo '<li> <a href="' . $category->getUrl() . '">';
echo $category->getName() . '</a></li>';
?>
</ul>
<?php endforeach; ?>
</ul>
</div>
</div>
Then add it to our layout using local.xml file.
in \app\design\frontend\base\default\layout\local.xml
<?xml version="1.0"?>
<layout version="0.1.0">
 <customer_account_edit translate="label">
   <reference name="left">
	 <block  type="core/template"
		before="-"
		name="mytheme.some.unique.name"
		template="mytheme/categories.phtml" />
  </reference>
</customer_account_edit>
</layout>
TO DO: COMPLETE THIS EXAMPLE

